Triple Maintenance Manual
Troubleshooting can be defined as the systematic search for the cause of a problem. The key to efficient troubleshooting is the word "systematic". When one is looking for a problem, there is always a best place to start, depending on the symptoms. The symptoms are the effects of the problem that you feel, hear, see, or smell. As an example, if the engine won't start, that is a symptom. The problem could be quite a few things, but by approaching things logically, all the possibilities except one can be eliminated. The last remaining possibility is then repaired and you are on your way.
There are three things an engine must have in order to run: (1) fuel, (2) compression, and (3) ignition. Any problem with the engine can be traced back to one of these three systems.
Fuel system problems are caused by either too much fuel or not enough. The amount of air the engine receives is directly related to the amount of fuel. Too much air shows up as too little fuel. Not enough air looks like too much fuel. Learning to distinguish between the two types of problems is not easy, so both sides of the symptom, the fuel side and the air side, must be explored.
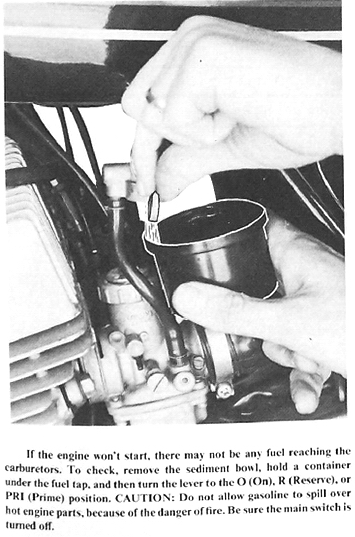
The most important thing is to be sure there is gasoline in the fuel tank. More engines have stopped more times for this reason than any other. Next, be sure fuel is getting to the carburetors. Pull the fuel lines off the carburetors, one at a time, and see if fuel runs out of them. CAUTION: Gasoline can be an extreme fire hazard. Catch the fuel in a container, especially if the engine is hot., or the fuel may ignite. If the fuel flows for a while and then stops, there may be a plugged vent in the fuel tank cap or something in the tank floating over the fuel cock and shutting off the flow. To check this, remove the cap and blow back through each of the carburetor fuel lines. You should be able to hear bubbling in the tank.

Too much fuel is a less frequent problem, but an engine can be flooded by the cold-start system when starting. A sticking float valve needle will allow the fuel to flow out of the carburetor overflow tubes into the valley in the upper engine case. CAUTION: If the carburetors are overflowing, turn the fuel cock lever OFF or be sure it is not in the PRI position. Fire danger is extreme; do not attempt to start the engine until the fuel spill has dried up. A flooded engine must be dried before it will start. Remove the spark plugs, leave the fuel cock and ignition turned OFF, and operate the kickstarter about ten times with the throttle wide open. Refit the spark plugs. Then try to start the engine, but leave the fuel turned off. If the carburetors overflow again, they must be removed and the float system repaired. For a detailed explanation of this procedure, see Chapter 3, Fuel System Service.
If the spark plugs are wet but the engine is not flooded, then fuel is not the problem. The next source of most prevalent problems is the ignition system, which consists of a primary circuit (low tension) and a secondary circuit (high tension). It is necessary to perform some basic tests to isolate the problem.
First you must eliminate any problems in the most troublesome part of any ignition system, the spark plug. The plug insulator can be cracked, the gap can be excessively wide or bridged, or the spark plug can be fouled because of excess gas, oil, or lack of a high-tension spark. If the spark plug is obviously defective or dirty, replace it and try to start the engine.
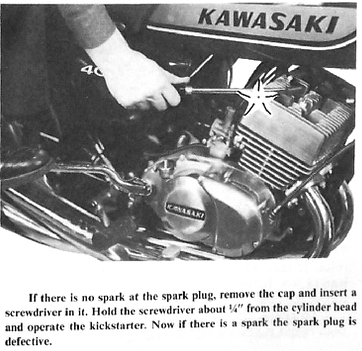
If the engine still won't start, remove the plug again and check out the rest of the ignition system by connecting the plug wire to a plug known to be good. Lay the plug on the head and kick start the engine. If there is no spark, or a very weak one, remove the plug and see if you can get a spark to jump from the wire to a metallic part of the engine. Hold the wire about 1/4" away and a good spark should jump; otherwise the ignition system is faulty.

Crank the engine slowly and make sure that the contact points (on the S-series and H1B models) are opening and closing and that the gap appears normal. The air gap on CDI models should be about 0.020 inch.

If the ignition and fuel systems check out, test the compression by removing the plugs and cranking the engine while holding your thumb over one of the spark plug holes. The compression should force your thumb off the hole. If a compression gauge is available, the reading should be 90-120 psi minimum.

In a two-stroke-cycle engine, the crankcase must be completely sealed, because it is an essential part of the fuel system. To check this, set the pistons, one at a time, at bottom dead center, and then remove the carburetor. Hold your palm over the intake ports and blow compressed air into the exhaust ports. If the pressure drops, the seals or gaskets are at fault and you will have to disassemble the engine. NOTE: This test is not valid on the H-series engines unless all the intake ports and the other two exhaust ports are plugged.
HARD STARTING TROUBLESHOOTING CHART
Troubles and Causes
1. Fuel system troubles
1a. Gasoline tank empty
1b. Fuel line pinched or restricted
1c. Fuel valve turned off or restricted
1d. Crankcase is flooded. The engine will seem to be
locked up because the piston is trying to compress the liquid gasoline rather
than a fuel/air mixture. CAUTION: Do not try to start an engine in this
condition, or major engine damage will result. Drain the excess gasoline.
1e. Carburetors improperly adjusted
1f. Carburetor jets restricted
1g. Carburetor float levels incorrect
1h. Carburetor float valves stuck open or closed
1i. Carburetor slides stuck open
1j. Cold-start lever used when engine is warm
1k. Throttle opens when cold-start lever is used.
NOTE: The cold-start jets function best when the carburetor throttle valves
are in the closed position.
1l. Cold-starting jets not opening
2. Ignition problems
2a. Spark plugs defective
2b. Spark plugs fouled, bridged, wet, or worn
2c. Contact point surfaces oily (S-series, H1B)
2d. Contact point gaps incorrect (S-series, H1B)
2e. Condenser shorted (S-series, H1B)
2f. Ignition coil defective
2g. Air gaps incorrect (CDI models)
2h. CDI units defective (CDI models)
2i. Signal coils defective (CDI models)
2j. Ground brushes defective (H1E, H1F)
2k. Low-speed coil defective (H2 models, H1D)
3. Compression problems
3a. Crankshaft seals pushed out of crankcase. NOTE:
This usually occurs when the crankcase is flooded and the engine is forced to
compress liquid gasoline.
3b. Cylinder base gaskets installed backward
3c. Piston rings broken
4. Transmission problems
4a. Clutch slipping
4b. Kickstarter ratchet slipping
This is probably the most common complaint about a motorcycle. In many cases, this involves no more than the engine running rough or a high-speed misfire. Reading the spark plugs can be a valuable tool here. If the plugs are fouled or badly worn, replace them and run the engine for a few miles. Then remove the plugs and have a close look at them. They should be a light brown color. If they are white colored, the engine is running lean or hot. Blackened plugs can be running too rich or can be too cold for the engine.
To check whether misfiring or erratic running at high speed is caused by a fuel or ignition problem, back off the throttle slightly. If the engine is rich, it will pick up speed. Next, slightly choke the engine; if it is lean, it will pick up speed. If choking or backing off the throttle doesn't help, the problem is probably in the ignition system
ERRATIC HIGH-SPEED PERFORMANCE TROUBLESHOOTING CHART
Troubles and Causes
1. Fuel system problems

1a. Gas tank vent restricted
1b. Carburetor main jets incorrect
1c. Water in fuel valve or carburetor float bowls
2. Ignition problems
2a. High-tension wiring defective
2b. Spark plug gaps incorrect
2c. Spark plug heat range incorrect
2d. Spark plug reach incorrect
2e. Intermittent short circuit in main wiring harness
2f. Contact point pivot binding or worn (S-series, H1B)
2g. Contact point surfaces oily (S-series, H1B)
2h. Coil defective
2i. Condenser defective (S-series, H1B)
2j. Main switch defective
2k. Air gap incorrect (CDI models)
2l. CDI units defective (CDI models)
2m. Ground brushes oily or dirty (H1E, H1F)
2n. Engine not properly grounded (S3, S3A, H1E, H1F)
2o. Signal coils defective (CDI models)
3. Compression problems
3a. Crankshaft seals leaking
3b. Cylinder base gaskets leaking
4. Lubrication system problems
4a. Incorrect oil type
4b. Oil pump cable incorrectly adjusted
ERRATIC LOW-SPEED PERFORMANCE TROUBLESHOOTING CHART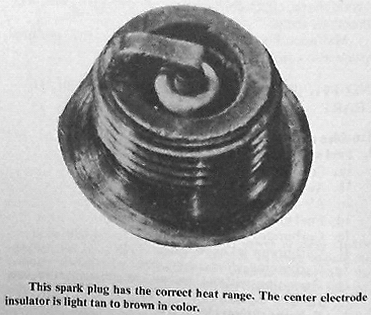
Troubles and Causes
1. Fuel system problems
1a. Idle air-adjusting screw settings incorrect
1b. Float levels incorrect
1c. Carburetor manifolds leaking air
1d. Operating without air cleaner (lean mixture)
1e. Idle fuel jets (pilot jets) incorrect size
2. Ignition problems
2a. Ignition timing incorrect
2b. Spark plugs fouled or worn
2c. Spark plug gaps incorrect
2d. Spark plug heat range too cold
2e. Spark plug reach too short
2f. Contact point gap incorrect (S-series, H1B)
2g. Low-speed coil defective (H2 models, H1D)
3. Compression problems
3a. Exhaust system clogged
3b. Crankshaft seals leaking
4. Lubrication system problems
4a. Oil pump lever does not return to idle position when engine is
idling
4b. Incorrect oil type
INSUFFICIENT POWER AND/OR OVERHEATING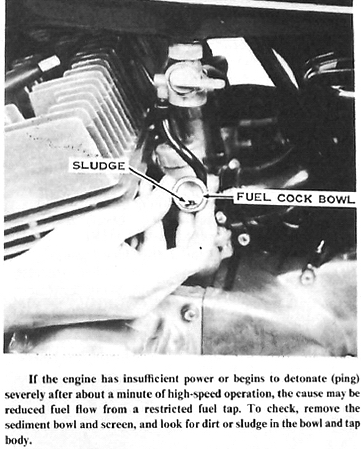
Lack of power in a two-stroke cycle engine can be caused by lubrication and mechanical problems in addition to fuel, ignition, and compression problems. Quite often, overheating will also be associated with insufficient power. The largest single problem in two-stroke engines is heat. Piston seizure and destruction of the engine can be the result of runaway heat. Be sure there is oil in the oil tank and check the oil pump adjustment.
Check for obvious mechanical problems, such as a slipping clutch or dragging brakes. Also check for an excessively tight drive chain or low tire pressure.
Remove the spark plugs and check their condition. If the plugs appear to be running lean (hot), check the fuel lines and the carburetors for restrictions. If these are in good shape, check for leaking cylinder base gaskets or crankshaft seals.
Malfunctions or misadjustments in the ignition system also cause overheating problems.
INSUFFICIENT POWER TROUBLESHOOTING CHART
Troubles and Causes
1. Fuel system problems
1a. Cold-start jets open
1b. Air cleaner dirty
1c. Air cleaner intake restricted
1d. Fuel tank vent clogged
1e. Carburetor main jets loose
1f. Carburetor jet needle clips loose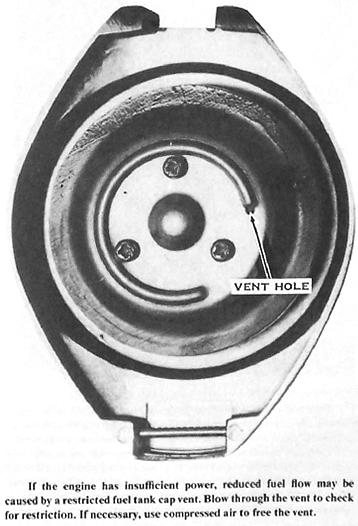
1g. Carburetor jets wrong size
1h. Operating without air cleaner (lean mixture)
1i. Exhaust system clogged
1j. Carburetor float bowl vents clogged or restricted
1k. Fuel valve filter screen restricted
2. Ignition problems
2a. Ignition timing incorrect
2b. Spark plugs fouled or worn
2c. Spark plug gaps incorrect
2d. Spark plug heat range incorrect
2e. Coil(s) defective
2f. Contact point gap incorrect (S-series, H1B)
2g. Contact point pivot binding or worn (S-series, H1B)
2h. Wire from contact points or CDI units to coils shorted or
grounded
2i. Poor electrical connection in the ignition circuit
2j. Main switch defective
2k. Condenser defective (S-series, H1B)
2l. Air gap excessive (CDI models)
3. Compression problems
3a. Piston seizure
3b. Piston, rings, and cylinder bore wore excessively
3c. Crankshaft seals leaking
3d. Cylinder base gaskets leaking
3e. Cylinder head gaskets leaking
3f. Cylinder heads warped
4. Lubrication system problems
4a. Oil of improper type
4b. Oil pump cable disconnected
4c. Oil pump defective. NOTE: A simple check for oil pump
condition is to touch it. If it is too hot to hold your finger on, then it
is not operating properly.
4d. Oil pump cable incorrectly adjusted
4e. Ball check valve in oil supply line restricted
4f. Oil tank vent hose pinched
4g. Transmission oil of wrong viscosity
5. Mechanical problems
5a. Clutch slipping
5b. Brakes dragging
5c. Wheel bearings not lubricated properly
5d. Drive chain adjusted too tightly
5e. Tire pressure too low
ENGINE OVERHEATING TROUBLESHOOTING CHART
Troubles and Causes
1. Fuel system problems
1a. Fuel valve restricted
1b. Fuel valve filter screen dirty
1c. Fuel lines pinched
1d. Carburetor jets too lean
1e. Carburetor float levels too low
1f. Operating without air cleaner (lean mixture)
1g. Carburetor manifolds leaking air
1h. Gas tank cap vent restricted
2. Ignition problems
2a. Spark plug heat range too hot
2b. Spark plug reach incorrect
2c. Ignition timing incorrect
3. Compression problems
3a. Excessive combustion chamber deposits
3b. Cylinder base gaskets leaking
3c. Cylinder head gaskets leaking
3d. Crankshaft seals leaking
4. Lubrication system problems
4a. Oil viscosity incorrect
4b. Improper oil type
4c. Oil pump cable incorrectly adjusted
4d. Oil line check valves restricted
4e. Oil tank vent hose pinched
4f. Oil channels blocked by cylinder base gaskets
4g. Oil line banjo bolts restricted
4h. Oil filter clogged
5. Mechanical problems
5a. Chain adjusted too tightly
5b. Brakes dragging
5c. Tire pressure too low
The two-stroke-cycle engine does not have oil in its crankcase as the four-stroke-cycle engine does. The incoming fuel-air mixture is first drawn into the crankcase and compressed there before going to the combustion chamber. Oil is injected into the engine behind the carburetor and mixes with the fuel mixture to lubricate the internal engine parts.
Some smoking from the exhaust in a two-stroke-cycle engine is normal for proper operation. Excessive smoking or oil consumption is not, and can cause spark plug fouling and poor performance.
Check to make sure that the oil pump is adjusted correctly and that the cable or pump lever is not binding at any point. If the pump is OK and you are using the correct oil, the crankshaft seals can be defective. This will allow transmission oil to be sucked into the crankcase and burned. Check for this by noting whether the transmission loses oil between changes without leaking on the ground.

EXCESSIVE EXHAUST SMOKE TROUBLESHOOTING CHART
Troubles and Causes
1. Engine lubrication system problems
1a. Oil pump cable incorrectly adjusted
1b. Oil pump cable binding
1c. Oil pump lever does not return to idle position when engine is
idling
1d. Oil line check valves stuck open
1e. Oil of incorrect viscosity or type
1f. Oil pump O-rings leaking
2. Compression problems
2a. Crankshaft seals leaking
2b. Crankcase mating surface leaking
Unusual noises are often a clue to some developing difficulty, and an investigation should be started before something breaks. The spark plugs are the first places to look for a clue. Specks of aluminum on the insulators are a sign of piston damage from preignition.
Copper flakes on the insulator come from the connecting rod big-end bearing and thrust washers. Check the plugs closely for a lean condition. The plugs should be a light brown color. A plug that is white or blistered is running too hot and must be checked to be sure it is of the correct heat range. Preignition is the result of an incorrect range, and this can do severe damage to the engine.
Mechanical noises of the powerplant can often be pinpointed by using a long screwdriver with one end held against your ear or using a rubber hose for the same purpose.
EXCESSIVE ENGINE NOISE TROUBLESHOOTING CHART
Troubles and Causes
1. Excessive engine noise
1a. Piston seizure
1b. Piston rings stuck in ring grooves
1c. Piston-to-cylinder clearances excessive
1d. Piston rings broken
1e. Piston ring-to-ring groove clearances excessive
1f. Cylinder head gaskets leaking
1g. Exhaust pipe-to-cylinder flanges leaking
1h. Exhaust pipe-to-muffler joints leaking
1i. Rotor hitting coils in alternator
1j. Crankshaft or connecting rod bearings worn
1k. Connecting rod small-end needle bearings or piston-pin holes
worn
1l. Muffler baffles loose
1m. Carburetor slides worn
2. Excessive engine vibration
2a. Piston seizure
2b. Engine mounts loose
2c. Engine mount rubber bushings deteriorated (S3, S3A, H1E, H1F,
KH500)
2d. Engine mount shims missing
2e. Connecting rods bent
2f. Crankshaft or connecting rod bearings worn
2g. Crankshaft out of balance
2h. Alternator rotor out of balance or loose
EXCESSIVE DRIVE TRAIN NOISE TROUBLESHOOTING CHART
Troubles and Causes
1. Excessive clutch noise
1a. Transmission oil too thin
1b. Primary pinion gear nut loose
1c. Clutch hub nut loose
1d. Primary gear backlash excessive
1e. Clutch housing finger-to-friction plate tab clearance excessive
2. Excessive transmission noise
2a. Transmission oil too thin
2b. Transmission oil too low
2c. Transmission gears worn or chipped
2d. Transmission shift forks galled
2e. Transmission shaft end-bearings worn
3. Excessive drive chain noise
3a. Chain adjusted too loosely
3b. Chain and/or sprockets worn
3c. Chain needs lubrication
EXCESSIVE FRAME NOISE TROUBLESHOOTING CHART
Troubles and Causes
1. Front end noise
1a. Front fork slider bushings worn (H1, H1A, H1C, S1
models;S2)
1b. Front fork oil too low
1c. Front fork triple-clamp bolts loose
1d. Front fork inner tube bent or galled
1e. Front wheel bearings worn or loose
1f. Front fork steering head bearings out of adjustment
1g. Handlebar control cables chafing
1h. Handlebar control levers loose
1i. Gas tank mount broken
2. Rear end noise
2a. Side covers loose
2b. License plate loose
2c. Tail lamp bracket loose
2d. Rear fender section loose
2e. Rear shock absorbers worn
2f. Rear shock absorber mount bushings worn
2g. Rear wheel rubber drive damper damaged
2h. Chain adjuster broken
2i. Rear wheel bearings loose or worn
2j. Tire rubbing against underside of fender or frame
2k. Oil tank mount broken
FRAME AND RUNNING GEAR PROBLEMS
Troubles associated with frame and running gear generally show up as poor handling, excessive tire wear, or inadequate braking. Poor riding quality can be caused by defective shock absorbers. The oil in the front forks should be replaced according to schedule, or the riding quality will suffer.
Poor braking can result from wear in the brake-actuating mechanism or from rusted parts. Dragging drum brakes are always the result of weak return springs or too tight an adjustment. A scraping sound indicates that the brake lining is worn.
HANDLING PROBLEM TROUBLESHOOTING CHART
Troubles and Causes
1. Front and rear wheels do not track
1a. Rear wheel alignment incorrect
1b. Front fork alignment incorrect
1c. Frame bent
1d. Swingarm bent
1e. Spokes loose
1f. Wheel rim bent
1g. Incorrect rear wheel spacers
2. Ride is too soft
2a. Fork springs weak
2b. Fork oil too low
2c. Tire pressure too low
3. Ride is too harsh
3a. Front fork oil level too high. CAUTION: It is
possible to ruin the front fork inner tube seals by using too much oil.
3b. Chain adjusted too tightly. NOTE: If the chain is
too tight, it relieves the rear shock absorbers from having to support the
motorcycle. In effect, you are using the drive chain as a spring.
3c. Tire pressure too high
4. Handlebars do not align with front wheel
4a. Fork triple clamp loose
4b. Inner fork tubes bent
4c. Handlebar bent
5. High-speed chassis vibration
5a. Wheel out of balance
5b. Wheel not true
5c. Tire bead not fully seated on wheel rim
5d. Wheel bearings worn
6. Unsure cornering
6a. Rear swingarm pivot nut loose
6b. Rear swingarm pivot bushings worn
6c. Front fork steering bearings excessively loose
6d. Tires worn
6e. Tires not broken in
6f. Tire pressure incorrect
6g. Front or rear suspension in need of repair
BRAKE PROBLEM TROUBLESHOOTING CHART
Troubles and Causes
1. Brake does not stop motorcycle normally
1a. Brake lining worn
1b. Front brake cable frayed or binding (H1, H1A, H1C, S1 models,
S2)
1c. Rear brake actuating mechanism obstructed
1d. Front brake hydraulic system needs bleeding (disc brake models)
2. Brake drags
2a. Operating cable binding or frayed
2b. Lack of lubrication of cable, camshafts, handlebar lever, or
foot pedal
2c. Rusty linkage
2d. Handlebar lever pivot nut adjusted too tightly
2e. Brake shoe return spring weak
2f. Rear wheel actuating rod bent or binding
2. Brake noise
3a. Torque link loose
3b. Brake drum or disc dirty or rusty
3c. Brake lining worn
3d. Brake lining dust in brake drum
3e. Brake lining glazed
3f. Not enough chamfer on leading edge of brake lining
3g. Brake shoe return spring broken
3h. Brake pad shims missing
3i. Disc warped
3j. Caliper bent or damaged
4. No adjustment possible
4a. Brake linings worn
4b. Brake actuating cam worn
4c. Actuating lever incorrectly indexed on brake camshaft
Clutches are all wet, multiplate-disc types. with varying numbers of plates. The basic function of the clutch is to disconnect power from the engine when a shift is being made or the engine is idling, and to connect it smoothly to the drive mechanism when the rider wishes to move forward. Clutch action must be smooth but positive
The best preventative maintenance for clutches is to maintain the correct free-play adjustment. Generally, there should be about 1/2" of lever movement at the outer end of the handlebar lever before the clutch-actuating mechanism begins to move the clutch parts. Too much free play will cause difficulty in shifting because the clutch will not disengage completely. Insufficient free play can cause the clutch to slip and eventually destroy itself.
NOTE: Even though the owner manual specifies 30W motor oil, it is not the best or even a good thing to use in your transmission. Modern motor oils are filled with additives that your clutch may cause the clutch to slip. Dino based, 80W gear oil is a better alternative. many may think 80W gear oil would be thick like syrup... not so. 80W gear oil is similar to 30W motor oil in viscosity. Any dino based 80W or 85W gear oil with a GL-5 rating is suitable.
CLUTCH PROBLEM TROUBLESHOOTING CHART
Troubles and Causes
1. Clutch drags when disengaged
1a. Transmission oil too thick
1b. Transmission oil of improper type
1c. Clutch adjustment incorrect
1d. Clutch springs plate warped
1e. Clutch springs of unequal tension
1f. Clutch steel or friction plates worn
1g. Clutch hub or housing splines worn
2. Clutch slips under load
2a. Oil of improper type
2b. Clutch adjustment incorrect
2c. Clutch spring tension weak
2d. Clutch friction plates worn
2e. Clutch pressure plate warped
2f. Clutch hub or housing splines worn
The most common complaint concerning transmissions is a difficulty in engaging a gear or in jumping out of gear. When transmission parts wear, it becomes more difficult to shift properly because extra clearances develop in the shifting mechanism. There is also the possibility that the linkage from the shift pedal to the shift shaft is incorrectly adjusted. all other problems require at least partial engine disassembly.
TRANSMISSION PROBLEM TROUBLESHOOTING CHART
Troubles and Causes
1. Transmission jumps out of gear
1a. Gear engagement dogs or holes worn
1b. Shift drum detent spring weak or broken
1c, Shift drum detent damaged
1d. Gear shift fork bent or worn
1e. Gear shifting drum locating plate loose or damaged
1f. Shift drum groove damaged
2. Gear shift lever does not engage transmission
2a. Gear shifting ratchet spring broken or weak
2b. Gear shifting fork broken
2c. Transmission sliding gear seized on shaft
2d. Shift drum binding in shift fork or crankcase
3. Gear shift lever does not return to normal position
3a. Gear shift shaft bent
3b. Shift lever slipping on shift shaft
3c. Shift shaft binding in crankcase
4. Gear shifting sequence incorrect
4a. Shift pedal-to-shaft linkage incorrectly installed
4b. Shift drum locating plate loose or installed incorrectly
4c. Shift forks installed incorrectly on shift drum
KICKSTARTER PROBLEM TROUBLESHOOTING CHART
Troubles and Causes
1. Kickstarter does not engage
1a. Kickstarter gear holder weak or broken
1b. Kickstarter gear teeth broken
1c. Clutch slipping
2. Kickstarter does not return
2a. Kickstarter return spring broken or out of position
2b. Kickstarter shaft bushings damaged
2c. Kickstarter shaft binding in engine cover
ELECTRICAL PROBLEM TROUBLESHOOTING CHART
Troubles and Causes
1. Battery voltage low
1a. Battery acid level low
1b. Battery discharged
1c. Battery defective
1d. Rectifier defective
1e. Snap connector loose
1f. Ground connections insecure
1g. Main switch defective
1h. Wiring harness cut or broken
1i. Stop lamp switch defective or adjusted incorrectly
1j. Charging coil defective
2. Headlamp burns out frequently
2a. Excessive vibration
2b. Headlamp bulb defective
2c. Bulb of improper type used
2d. Voltage regulator defective
2e. Voltage regulator removed (S-series)
3. Fuse burns out
3a. Direct short from battery to frame
3b. Stop lamp switch defective
3c. Short in main wiring harness
3d. Fuse of improper type
4. Engine stops when lights are turned on
4a. Spark plugs defective or worn
4b. Signal coil air gap incorrect (CDI models)
4c. Contact point rubbing block worn (S-series, H1B)
4d. Rotor magnets weak (H2 models, H1D, H1E, H1F)
4e. Ignition advanced or retarded too much
4f. Engine not grounded (H1E, H1F)
5. Tail lamp bulb burned out
5a. Bulb of improper type used
5b. Tail lamp wires shorting
5c. Tail lamp ground connection loose
5d. Vibration from broken tail lamp bracket or loose rear fender
6. Neutral indicator lamp does not light
6a. Wire from neutral indicator switch cut
6b. Bulb burned out
6c. Neutral indicator switch defective
6d. Main wiring harness cut or pinched