ZX2-3 fitting instructions for Kawasaki model H2/H1D
------------------------------
This model Starfire CDI unit replaces completely the three
existing Kawasaki CDI units, the rectifier box, and the faulty High/Low speed
coil in one hit.
REMOVE OR DISCONNECT BATTERY BEFORE INSTALLATION
1) Remove the original CDI units and rectifier box and mount the
Starfire unit in its place . The Starfire unit is very compact and will take up
very little space. Also remove the existing ignition coils, these are grounded
via the mounting lugs and are unsuitable for this installation.... see below. It
will be helpful to mark the three WHITE wires in the harness to identify which
cylinder they fire.... L/C/R
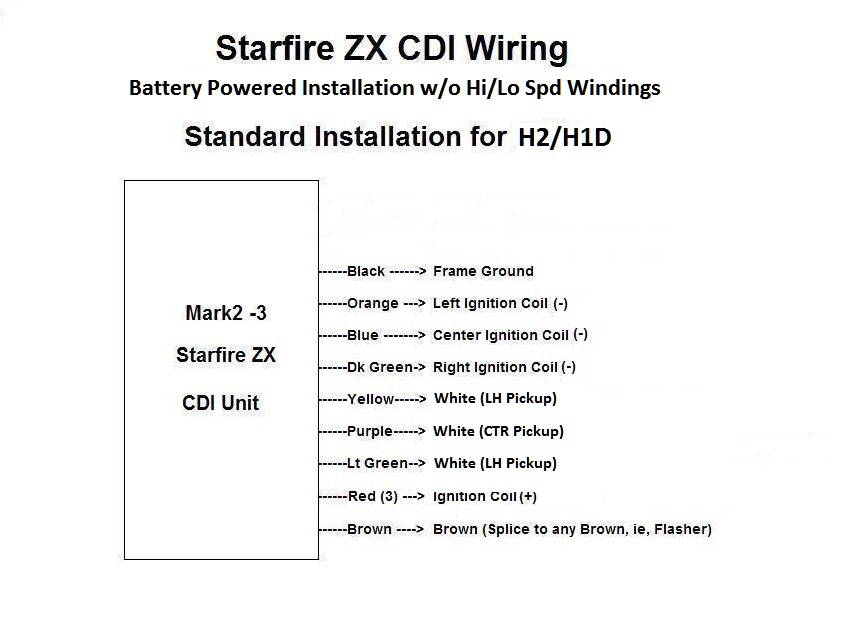
2) Mount the three new ignition coils in place. The three +
terminals on each coil are connected to the three RED wires from the CDI. A
small harness here will ease future dismantling.
3) Connect the CDI ORANGE, BLUE and DARK GREEN wires to the -
terminal on each of the three ignition coils. These correspond to the
left/center and right hand cylinders respectively. These wires are available in
the harness, they are all RED. If used, they must be reconnected at the
designated coil terminals.
4) Identify the three WHITE wires in the harness from the
alternator housing, these are the three signal/trigger coil feeds. These connect
to the Starfire YELLOW/PURPLE and LIGHT GREEN. These correspond to the
left/center and right hand cylinders respectively. If previously marked as in
(1), life will be easy.
5) Connect the BLACK CDI wire to a firm ground.
6) Connect the CDI BROWN wire to any handy brown wire in the
harness... this is the 12 volt supply from the ignition switch. This MUST be
zero voltage when key is off, and 12 volts when key is on.
7) Carefully check your work. It is vital all connections are
correct and secure before applying power. Make certain that the spark plugs are
connected to the HT leads at all times to prevent coil damage. Refit battery.
Switch on key and listen for a low buzz from the CDI. If it is
squeeling, there is a fault. Turn off immediately and correct the
error.
8) The bike will now run.
The ignition timing will also require checking with a timing
light.
If there is no spark at this point, carefully check there is
300-350 volts at the coil primaries with the key on....., measure carefully
with a multimeter . Be very careful.... this voltage can kill! For this reason,
I also suggest insulating all exposed terminals on the ignition coils, easily
done with a thick application of womens nail varnish or similar.
Suitable ignition coils are readily available from several
vendors. I recommend 12 volt points type coils, these will measure around 4 ohms
across the primary terminals. These perform best with the Starfire units as the
higher inductance and core size makes for a significantly longer duration spark.
Any iggy coil is suitable though, try not to go below 1 ohm across the primary
as this will begin to stress the unit and will
affect reliability.