1) Standard fitting in place of the stock unit... small size. Neat installation using original wiring harness.
2) Brings the complete ignition system up to modern standards, no longer requiring to use the original unreliable, expensive or hard to replace parts.
3) Converts the system to the early H1 style "battery powered mode", eliminating the need for the Hi/Lo Spd high voltage coils . Additional power consumption here is 12 watts maximum.
For road racing and drag racing applications:
1) The new CDI will run as a simple minimal equipment, stand alone system.
2) Will run 1.5 hours on a small set of AA nicads or similar... total loss system for weight reduction.
3) Small and light weight.
4) Potentially allows the rotor, and ALL
rotating mass to be completely or partially removed from the crankshaft.
STARFIRE ZX Mark2-1 CDI INSTALLATION
INSTRUCTIONS FOR H1E/F and KH500
-------- STANDARD FACTORY CONFIGURATION --------
1) Mount CDI unit to bike
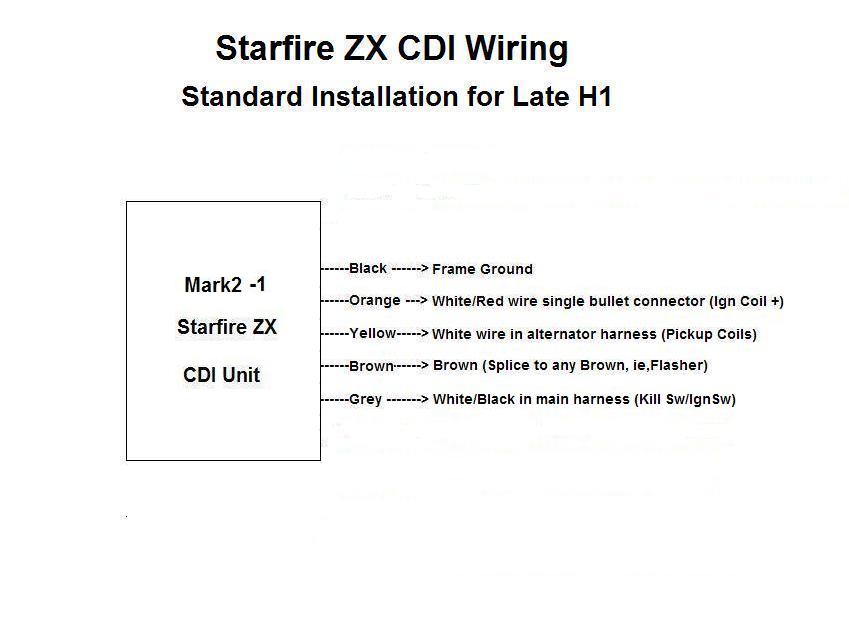
2) Connect the CDI BROWN wire to a source of 12 volts with ignition key on (any Brown wire)
3) Connect CDI YELLOW wire to WHITE wire in alternator harness (trigger/pulse coil)
4) Connect CDI ORANGE wire to WHITE/RED wire in harness single bullet connector (three ignition coil terminals)
5) Connect the BLACK wire from the CDI to a firm ground
6) Connect the GREY wire from the CDI to
the BLACK/WHITE wire in harness (kill switch)
Note: The GREY wire is used to disable
the ZX MK2 unit. This wire is taken to ground through the kill, or
engine stop switch. This wire can also be used with a hidden switch as
an anti theft, or used with an external rev limiting RPM counter.
Current through this wire is approx 12 milliamps.
IMPORTANT: If the ignition key is left on
with the kill switch enabled, the CDI will be in standby mode and still
consuming battery power.
The bike will now run independent of the High Voltage Stator windings. The extra current drain is 12 watts maximum at 12000 RPMs.
---------MINIMAL CONFIGURATION for
dragracing/ roadracing applications --------
For minimal equipment drag racing/road racing use, The Starfire CDI will function as a complete stand alone unit. It is suggested a small battery pack be used to supply the required voltage. A pack of 8 2000 mAh AA rechargeable NiMh or NiCads will run the unit for approximately 1.5 hours. . This unit also allows the removal, completely or partially, of the rotor to reduce the rotating mass on the crankshaft.
Wire the CDI as follows:
1 ) mount the CDI unit to the bike
2 ) connect the CDI BLACK wire to a firm ground.
3) Connect the CDI ORANGE wire to the ignition coil primary, POSITIVE side.
4) Connect the ignition coil negative to a firm ground
5) Connect the CDI YELLOW wire to the trigger /pulse coil.
6) Connect the CDI BROWN wire to a kill switch or deadmans.
7) The other side of this switch is
connected to the battery supply.
The bike will now run.