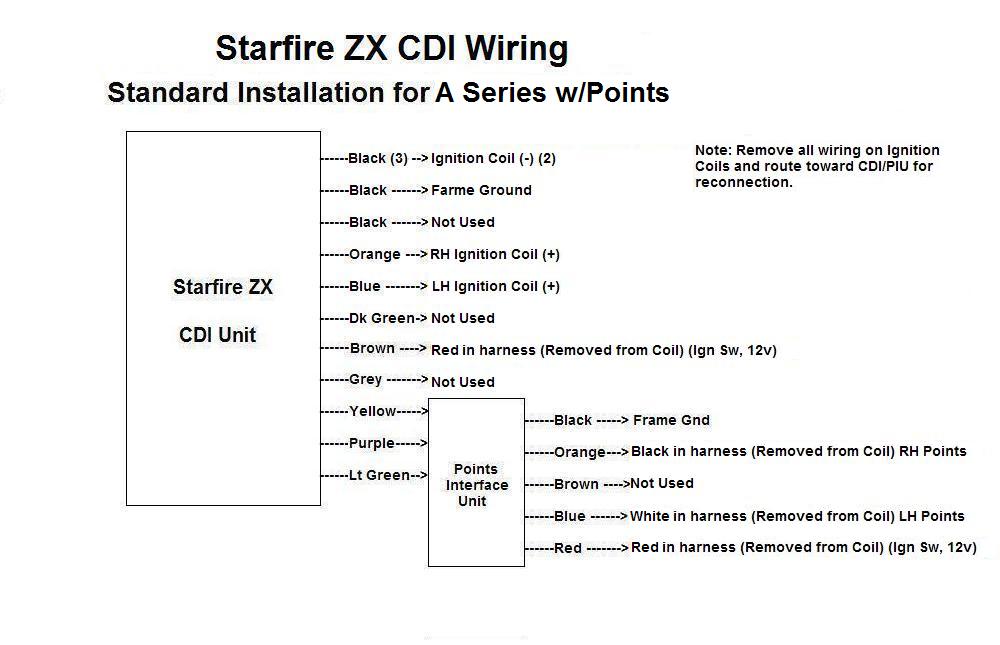
ZX CDI Fitting instructions for the Kawasaki A1 SAMURAI
and A7 AVENGER
with points.
1) Disconnect battery and mount the CDI.
2) Identify the left and right ignition coil primary leads, these
terminate in 4 bullet connectors. Disconnect the 2 REDs and the BLACK,
WHITE
3) Connect two BLACK wires from the CDI unit to the RED wire, one on
each coil. (IGNITION COIL COMMON)
4) Connect the ORANGE wire from the CDI to the BLACK on the coil (ignition coil
right)
5) Connect the BLUE wire from the CDI to WHITE on the coil (ignition coil left)
6) Connect the CDI BROWN wire to the RED removed in step 3
7) Mount the Points Interface Unit where it can easily be seen when
adjusting the timing.
8) Connect the CDI YELLOW, PURPLE and LIGHT GREEN to the PIU YELLOW,
LIGHT GREEN and PURPLE.
6) Identify the 2 wires coming up from the point assemblies in the
magneto, these are the BLACK/WHITE as in step 2
7) Connect the PIU ORANGE to the WHITE in harness as in step 2 (points
left)
8] Connect the PIU BLUE wire from the CDI to the BLACK wire as in Step 2
(points right)
9) Connect one CDI BLACK wire from the CDI to a firm ground
10) Connect the BROWN wire from the CDI to the BROWN wire in the
harness. This is the 12 volt ignition feed.
11) connect the PIU RED wire to the connector as in step 2
12) Connect the PIU BLACK wire to a firm ground.
11) Cut short unused wires from the CDI and seal the ends with a dab of
nail varnish. These are BLACK x 2, DARK GREEN x1, LIGHT GREEN x 1 GREY x 1
12) Cut short the unused BROWN wire on the PIU and treat as above.
The GREY can be connected to a separate kill switch, the engine will
stop when this wire is grounded.
The bike will now run.